开放API签名认证的设计并开发对应的SDK
1. 为什么需要签名认证呢?
假设我们开放了一个接口,而我们的服务器只允许处理1000个请求,如果这个时候由用户疯狂发送几万个请求,可能会导致服务器宕机,影响其他用户的正常使用。这个情况下我们需要对接口进行限流,而如果我们接口的内容很重要,有一定的保密性 ,这个时候就不可以随便让用户调用,需要让用户去申请签名认证来调取接口,通过接口的认证之后才可以访问到资源。
2. 代码设计
我们以一个简单的接口为例,一步一步从接口的开发到签名认证系统的设计:
2.1. 接口开发
首先我们先简单的创建get和post请求的接口:
package com.stukk.model;

import lombok.AllArgsConstructor;
import lombok.Builder;
import lombok.Data;
import lombok.NoArgsConstructor;

/**
 * @Author: stukk
 * @Description: 用户类(仅供测试)
 * @DateTime: 2023-12-20 16:20
 **/
@Data
@Builder
@AllArgsConstructor
@NoArgsConstructor
public class User {
    private String userName;
}


package com.stukk.controller;

import com.stukk.model.User;
import org.springframework.web.bind.annotation.*;

/**
 * @Author: stukk
 * @Description: 测试开发API的接口
 * @DateTime: 2023-12-20 16:20
 **/
@RestController
@RequestMapping("/user")
public class UserController {
    @GetMapping("/")
    public String getNameByGet(String name){
        return "用户名是:"+name;
    }

    @PostMapping("/name")
    public String getNameByPost(@RequestParam String name){
        return "用户名是:"+name;
    }

    @PostMapping("/")
    public String getUserNameByPost(@RequestBody User user){
        return "用户名是:"+user.getUserName();
    }


}
application.yml文件配置:
server:
  port: 8099
  servlet:
    context-path: /api
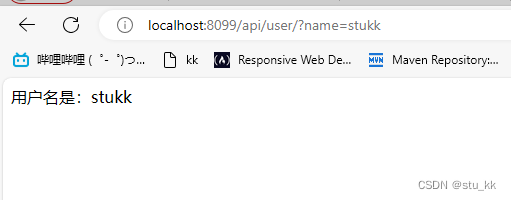
启动springboot之后,我们在浏览器输入:localhost:8099/api/user/?name=stukk
2.2. 第三方接口的客户端开发
每次让用户使用http去调用显然不太好,我们需要封装方法给用户传参调用就行了。
package com.stukk.client;
import cn.hutool.http.HttpRequest;
import cn.hutool.http.HttpResponse;
import cn.hutool.http.HttpUtil;
import cn.hutool.json.JSONUtil;
import com.stukk.model.User;
import org.springframework.web.bind.annotation.RequestParam;
import java.util.HashMap;
import java.util.Map;
/**
* @Author: stukk
* @Description: 第三方接口客户端
* @DateTime: 2023-12-20 16:33
**/
public class ApiClient {
public String getNameByGet(String name){
// Get请求
Map<String,Object> paramMap = new HashMap<>();
paramMap.put("name",name);
String result = HttpUtil.get("http://localhost:8099/api/user/", paramMap);
System.out.println(result);
return result;
}
public String getNameByPost( String name){
// Post请求
Map<String, Object> paramMap = new HashMap<>();
paramMap.put("name",name);
String result = HttpUtil.post("http://localhost:8099/api/user/name", paramMap);
System.out.println(result);
return result;
}
public String getUserNameByPost(User user){
// Post请求
String jsonStr = JSONUtil.toJsonStr(user);
Map<String, Object> paramMap = new HashMap<>();
HttpResponse httpResponse = HttpRequest.post("http://localhost:8099/api/user/").body(jsonStr).execute();
System.out.println(httpResponse.getStatus());
String result = httpResponse.body();
System.out.println(result);
return result;
}
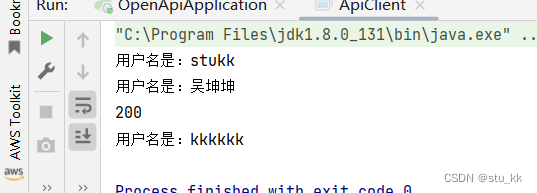
public static void main(String[] args) {
ApiClient apiClient = new ApiClient();
apiClient.getNameByGet("stukk");
apiClient.getNameByPost("吴坤坤");
apiClient.getUserNameByPost(User.builder().userName("kkkkkk").build());
}
}
运行结果:
好了,我们已经实现了接口的开发和调用了,但是上述例子只是一个简单的例子,具体情况还需要根据项目需求去添加内容。
2.3.简单的校验
上述接口最大的问题就是,任何人、任何时间都可以来访问我的接口,这样子相当于接口在裸奔了,安全性是没有的,所以我们可以初步一些简单的校验功能:
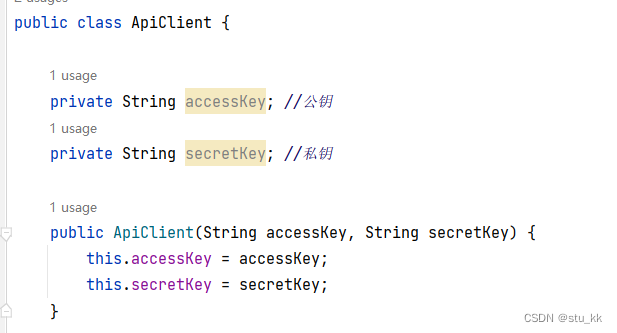
加上公钥和私钥:
    private String accessKey; //公钥
    private String secretKey; //私钥

    public ApiClient(String accessKey, String secretKey) {
        this.accessKey = accessKey;
        this.secretKey = secretKey;
    }

然后我们现在接口处加上很呆的判定:
    @PostMapping("/")
    public String getUserNameByPost(@RequestBody User user, HttpServletRequest request){
        String accessKey = request.getHeader("accessKey");
        String secretKey = request.getHeader("secretKey");
        if(!accessKey.equals("stukk") || !secretKey.equals("kkkkkk")){
            throw new RuntimeException("无权限");
        }
        return "用户名是:"+user.getUserName();
    }
之后运行就无权限了:
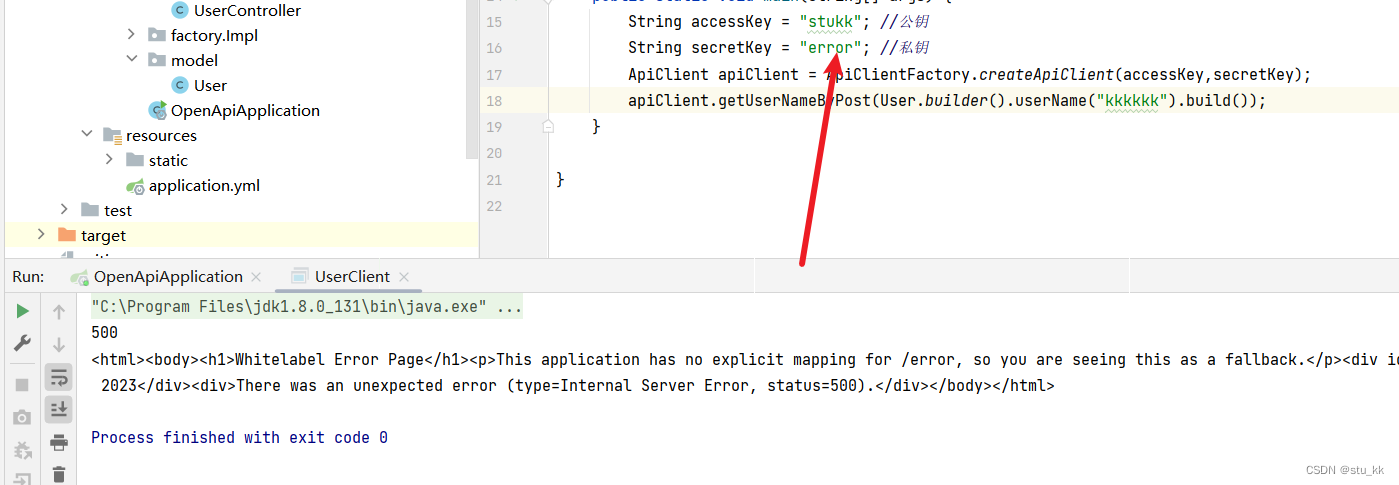
但是显然这种虽然能有效的防止别人随意调用,但是只要有人拦截了我们的请求,获取到请求头中的ak和sk,那么就能随意调用了,所以密码是不能以明文的形式传输的!不传递怎么确定是合规的访问呢?
2.4.标准的API签名认证
在标准的 API 签名认证中,我们需要传递一个签名(Sign)。通常我们不是直接将密钥传递给后台,而是根据密钥生成一个签名。我们可以使用MD5单向加密算法来加密密钥生成签名,单向意味着只可加密不可解密的,所以我们需要保存用户的密钥,在判定时,再加密一次对比加签名既可以判断是不是合规的请求了。
为了更加的安全,我们还可以
1. 在请求头加上随机数,后端只接受随机数一次,这样可以解决请求重放问题,更加的安全了
2. 每个请求在发送时携带一个时间戳,并且后端会验证该时间戳是否在指定的时间范围内,例如不超过10分钟或5分钟。这可以防止对方使用昨天的请求在今天进行重放。
详情见代码:
/**
 * @Author: stukk
 * @Description: 签名工具
 * @DateTime: 2023-12-20 17:47
 **/
public class SignUtil {
    public static String genSign(String body,String secretKey){
//        使用基于SHA256的MD5算法
        Digester md5 = new Digester(DigestAlgorithm.SHA256);
        String content = body + "." + secretKey;
//        加密得到签名
        return md5.digestHex(content);

    }
}


/**
 * @Author: stukk
 * @Description: 第三方接口客户端
 * @DateTime: 2023-12-20 16:33
 **/
public class ApiClient {

    private String accessKey; //公钥
    private String secretKey; //私钥

    public ApiClient(String accessKey, String secretKey) {
        this.accessKey = accessKey;
        this.secretKey = secretKey;
    }

    public String getNameByGet(String name){
//        Get请求
        Map<String,Object> paramMap = new HashMap<>();
        paramMap.put("name",name);
        String result = HttpUtil.get("http://localhost:8099/api/user/", paramMap);
        System.out.println(result);
        return result;
    }

    public String getNameByPost( String name){
//        Post请求
        Map<String, Object> paramMap = new HashMap<>();
        paramMap.put("name",name);
        String result = HttpUtil.post("http://localhost:8099/api/user/name", paramMap);
        System.out.println(result);
        return result;
    }

    public String getUserNameByPost(User user){
//        Post请求
        String jsonStr = JSONUtil.toJsonStr(user);
        HttpResponse httpResponse = HttpRequest.post("http://localhost:8099/api/user/")
                .addHeaders(getHeaders(jsonStr))
                .body(jsonStr)
                .execute();
        System.out.println(httpResponse.getStatus());
        String result = httpResponse.body();
        System.out.println(result);
        return result;
    }

    private Map<String,String> getHeaders(String body){
        Map<String,String> map = new HashMap<>();
        map.put("accessKey",accessKey);
//        不能直接加上密钥
        map.put("secretKey",secretKey);
//        生成随机数,4个随机数字字符串
        map.put("nonce", RandomUtil.randomNumbers(4));
//        请求体
        map.put("body",body);
//        时间戳
        map.put("timestamp",String.valueOf(System.currentTimeMillis()/1000));
//        签名:
        map.put("sign", SignUtil.genSign(body,secretKey));
        return map;
    }
}

package com.stukk.controller;

import com.stukk.model.User;
import com.stukk.utils.SignUtil;
import org.springframework.web.bind.annotation.*;

import javax.servlet.http.HttpServletRequest;
import javax.servlet.http.HttpServletResponse;
import java.util.HashMap;
import java.util.HashSet;
import java.util.Set;

/**
 * @Author: stukk
 * @Description: 测试开发API的接口
 * @DateTime: 2023-12-20 16:20
 **/
@RestController
@RequestMapping("/user")
public class UserController {
    @GetMapping("/")
    public String getNameByGet(String name){
        return "用户名是:"+name;
    }

    @PostMapping("/name")
    public String getNameByPost(@RequestParam String name){
        return "用户名是:"+name;
    }

    @PostMapping("/")
    public String getUserNameByPost(@RequestBody User user, HttpServletRequest request){
        String accessKey = request.getHeader("accessKey");
        String nonce = request.getHeader("nonce");
        String timestamp = request.getHeader("timestamp");
        String sign = request.getHeader("sign");
        String body = request.getHeader("body");
        Set<String> nonces = new HashSet<>();
//        数据库查询验证这个accessKey
        if(!accessKey.equals("stukk")){
            throw new RuntimeException("无权限");
        }
//        检验随机数,判断是不是出现过
        if(nonces.contains(nonce)){
            throw new RuntimeException("请重试");
        }
        nonces.add(nonce);
        long preTimestamp = Long.parseLong(timestamp);
        long nowTimestamp = System.currentTimeMillis()/1000;
        if(nowTimestamp - preTimestamp > 36000){ //10小时?
            throw new RuntimeException("签名超时");
        }
        //根据accessKey从数据库查出secretkey,这里假设为kkkkkk
        String secretLKey = "kkkkkk";
        String correctSign = SignUtil.genSign(body, secretLKey);
        if(!correctSign.equals(sign)){
            throw new RuntimeException("签名错误");
        }
        return "用户名是:"+user.getUserName();
    }
}

/**
 * @Author: stukk
 * @Description:
 * @DateTime: 2023-12-20 17:09
 **/
public class UserClient {
    public static void main(String[] args) {
        String accessKey = "stukk"; //公钥
        String secretKey = "kkkkkk"; //私钥
        ApiClient apiClient = new ApiClient(accessKey, secretKey);
        apiClient.getUserNameByPost(User.builder().userName("kkkkkk").build());
    }

}
这样子我们就完成了标准的API签名认证了,接下来开发SDK:
3.开发SDK
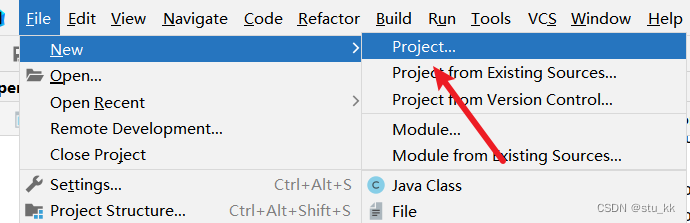
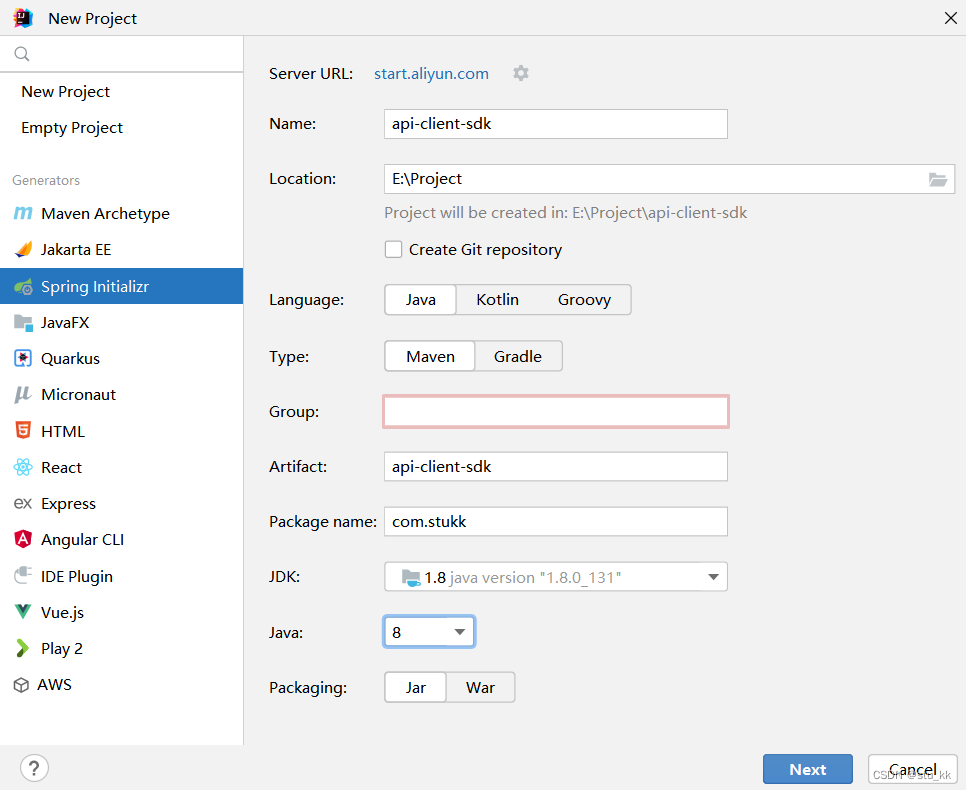
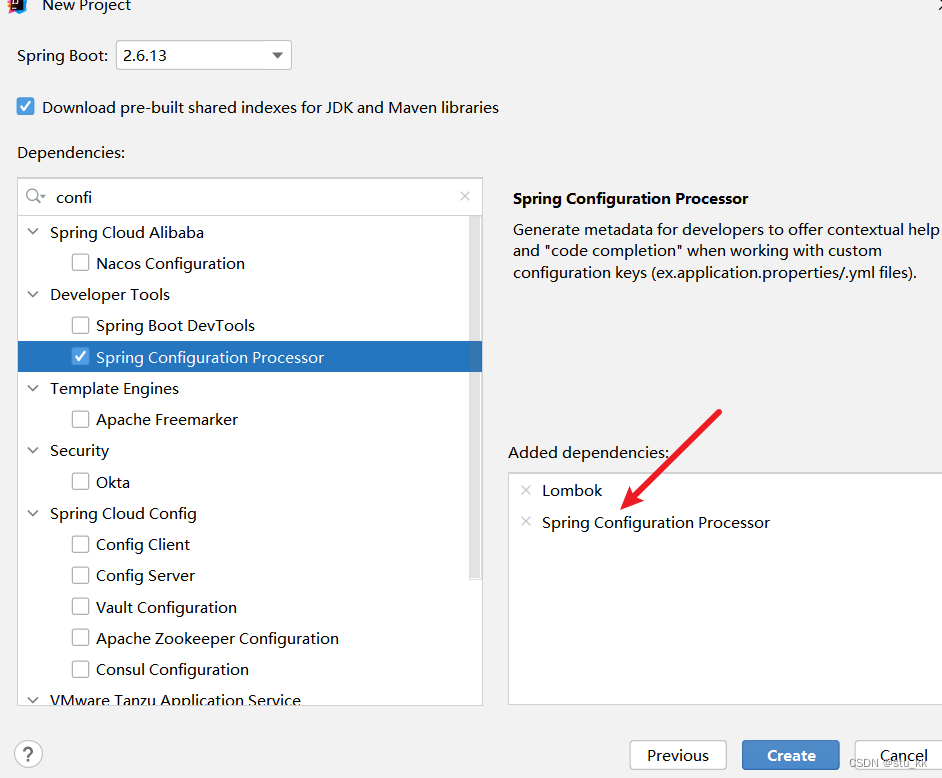
3.1.新建项目
3.2.配置pom.xml配置文件
<?xml version="1.0" encoding="UTF-8"?>
<project xmlns="http://maven.apache.org/POM/4.0.0" xmlns:xsi="http://www.w3.org/2001/XMLSchema-instance"
         xsi:schemaLocation="http://maven.apache.org/POM/4.0.0 https://maven.apache.org/xsd/maven-4.0.0.xsd">
    <modelVersion>4.0.0</modelVersion>
    <parent>
        <artifactId>spring-boot-starter-parent</artifactId>
        <groupId>org.springframework.boot</groupId>
        <version>2.7.13</version>
        <relativePath/>
    </parent>
    <groupId>com.stukk</groupId>
    <artifactId>api-client-sdk</artifactId>
<!--    版本号-->
    <version>1.1.1</version>
    <name>api-client-sdk</name>
    <description>api-client-sdk</description>
    <properties>
        <java.version>1.8</java.version>
    </properties>
    <dependencies>
        <dependency>
            <groupId>org.springframework.boot</groupId>
            <artifactId>spring-boot-starter</artifactId>
        </dependency>
        <dependency>
            <groupId>org.springframework.boot</groupId>
            <artifactId>spring-boot-configuration-processor</artifactId>
            <optional>true</optional>
        </dependency>
        <dependency>
            <groupId>org.projectlombok</groupId>
            <artifactId>lombok</artifactId>
            <optional>true</optional>
        </dependency>
    </dependencies>

</project>

3.3.创建配置类
package com.stukk;

import lombok.Data;
import org.springframework.boot.context.properties.ConfigurationProperties;
import org.springframework.context.annotation.ComponentScan;
import org.springframework.context.annotation.Configuration;

/**
 * @Author: stukk
 * @Description: 创建配置类
 * @DateTime: 2023-12-20 19:04
 **/
//标记为配置类
@Configuration
@ConfigurationProperties("stukk.api") //能够读取application.yml配置,载入属性
@Data //lombok注解
@ComponentScan //自动扫描组件
public class ApiClientConfig {
    private String accessKey;
    private String secretKey;
}
项目中的 client包、model包、utils包复制:

在resources目录下创建META-INF/spring.factories文件:
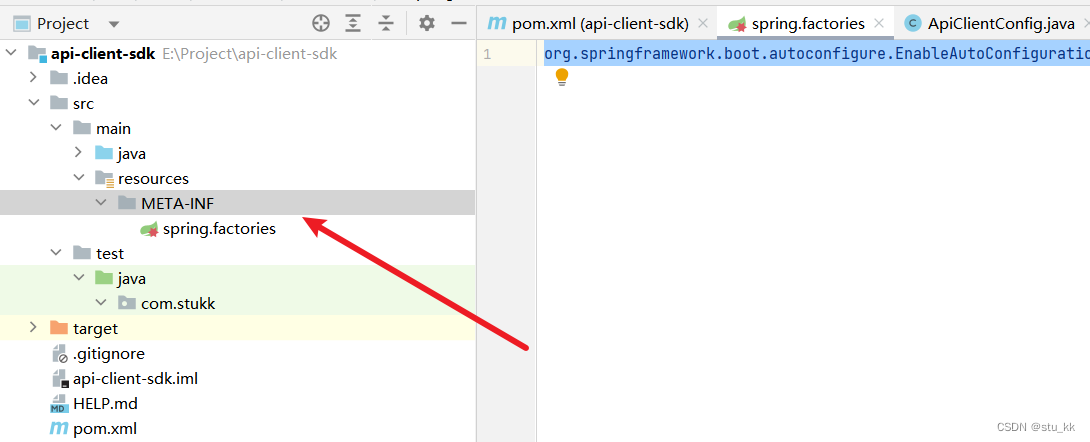
org.springframework.boot.autoconfigure.EnableAutoConfiguration=com.stukk.ApiClientConfig3.4.下载jar包?

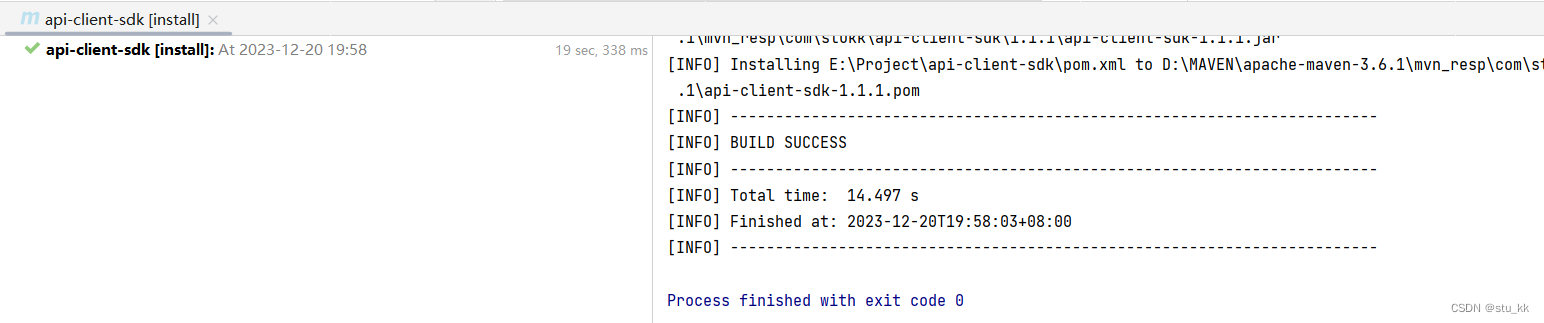
下载的地方就是我们maven配置的地方:

4.引入SDK?
接下来回到原来的项目,删掉model、client、utils包,引入这个SDK依赖:

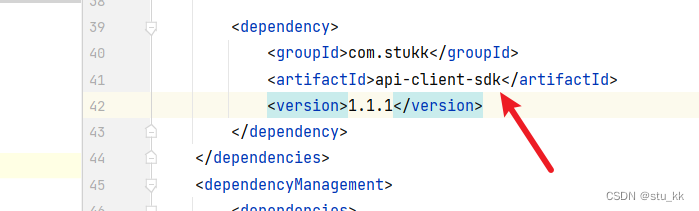
        <dependency>
            <groupId>com.stukk</groupId>
            <artifactId>api-client-sdk</artifactId>
            <version>1.1.1</version>
        </dependency>
我们会发现application.yml会提示我们生成这个accessKey和secretKey配置:
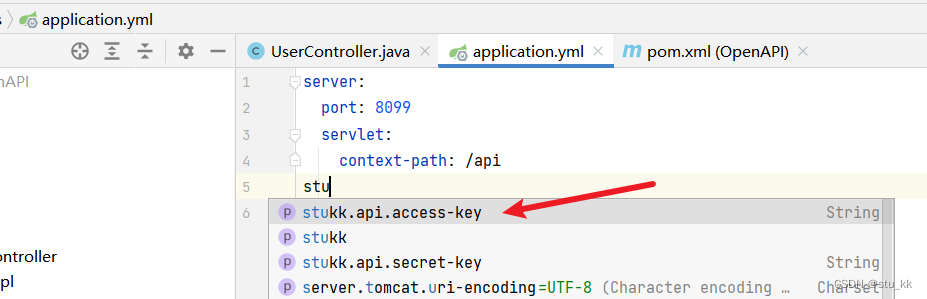
server:
  port: 8099
  servlet:
    context-path: /api
stukk:
  api:
    access-key: stukk
    secret-key: kkkkkk
3.5编写测试类测试:
package com.stukk;

import com.stukk.client.ApiClient;
import com.stukk.model.User;
import org.junit.jupiter.api.Test;
import org.springframework.boot.test.context.SpringBootTest;

import javax.annotation.Resource;

@SpringBootTest
class OpenApiApplicationTests {

    @Resource
    private ApiClient apiClient;

    @Test
    void testSDK() {
        User user = new User(kk__SDK");
        String result = apiClient.getUserNameByPost(user);
        System.out.println(result);
    }

}
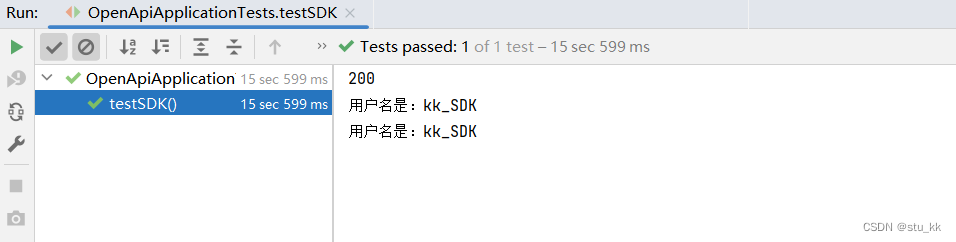
成功调用了。?
本文来自互联网用户投稿,该文观点仅代表作者本人,不代表本站立场。本站仅提供信息存储空间服务,不拥有所有权,不承担相关法律责任。 如若内容造成侵权/违法违规/事实不符,请联系我的编程经验分享网邮箱:veading@qq.com进行投诉反馈,一经查实,立即删除!
- Python教程
- 深入理解 MySQL 中的 HAVING 关键字和聚合函数
- Qt之QChar编码(1)
- MyBatis入门基础篇
- 用Python脚本实现FFmpeg批量转换
- qt .pro工程转vs工程
- 【强力推荐】GitCode AI开源搜索,面向开发者的专业AI搜索
- [足式机器人]Part2 Dr. CAN学习笔记-Advanced控制理论 Ch04-6 线性控制器设计Linear Controller Design
- Autosar信息安全入门系列01-SecOC基础介绍
- 安全认证 | CISP PTS有必要考吗?CISP的报考条件是什么?
- SLAM学习入门--机器学习
- Python patchworklib任意合并子图,多图形混合排版
- Macos 删除过期失效的软链接symlink
- 群晖Drive搭建云同步服务器结合内网穿透实现Obsidian笔记文件远程多端同步
- SpringIOC之AbstractResourceBasedMessageSource